
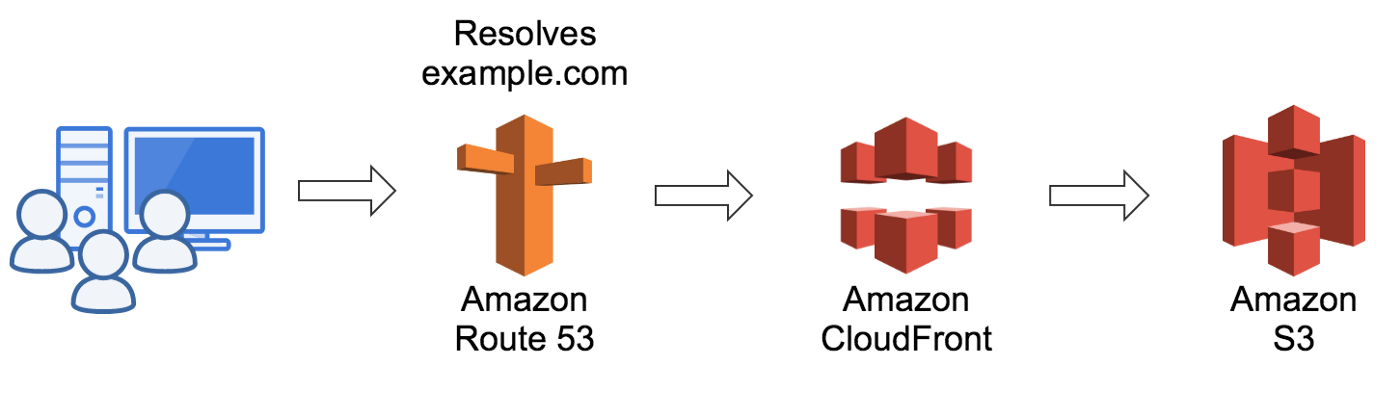
Hugo + Cloudfront
As you can read on my previous blog post, I’ve choosen a set of AWS technologies to back this blog, however here’s the full post on how to set up your own Hugo blog on AWS using CloudFront.
Create an example Hugo website
You can use this Quickstart to set up your example Hugo website. However, here’s the TL;RD:
hugo new site quickstart
cd quickstart
git init
git submodule add https://github.com/budparr/gohugo-theme-ananke.git themes/ananke
echo 'theme = "ananke"' >> config.toml
hugo new posts/my-first-post.md
Now you can see locally the result by running:
hugo serve -D
And visiting http://localhost:1313
By using the above command, you’ll have LiveReload by default, so you can start editing your MarkDown content and watching the result in real time.
Now let’s publish our example website, we can do this by running the command:
hugo -D
This will build your website directly on the public directory, so this is the content that we’re going to publish and store in our S3 bucket.
Create an S3 bucket
First we need to create an S3 bucket to host our static content:
- Log into the AWS console or configure your AWS credentials, I’ll use both approaches.
- Go to S3 and create a bucket with a given name
aws s3 mb myexample-website
- Upload the static content to the newly created bucket
cd public
aws s3 sync . s3://myexample-website
Create a CloudFront distribution
- Go to the AWS console and then to CloudFront
- Click on ‘Create Distribution’
- Click on ‘Origin domain Name’ and select the bucket that we created previously , I’m going to describe the necesary or suggested values that you need to fill:
- Viewer Protocol Policy: Redirect HTTP to HTTPS
- Allowed HTTP Methods: GET, HEAD
- Price Class: I’ve used ‘Use Only U.S., Canada and Europe’ but you can use the one that better fits your user base
- Alternate Domain Names: You need to set up this if you have a custom domain and a custom SSL cert, in my case raze.mx
- SSL Certificate: Choose a previously created certificate or the default CloudFront if you’re not using your custom domain name
- Default root Object: You can set up this one if you need the default behaviour to be rendering the
index.htmlobject, however you can leave this blank since we’re going to solve this later
All other setting can be set to default.
It’s gping to take some time to create your distribution since it needs to create some stuff on all Edge locations for your distribution, so you need to wait for the distribution to show the Status as Deployed and State as Enabled.
Once your Distribution is Deployed and Enabled, you need to setup an OAI for your CloudFront Distribution in order to allow this distribution to access the objects on your S3 bucket:
- Go to the AWS console>CloudFront>Click on your distribution
- Click on Origins and Origin Groups
- Click on ‘Create Origin’ and fill up the following settings:
- Origin Domain Name: myexample-website
- And hit Create.
Once it’s created do the following:
Select the origin on the console and click on Edit
- Change this settings:
- Restrict Bucket Access: Yes
- Origin Access Identity: Create a New Identity & Fill a Descriptive name for your Identity
- Grant Read Permissions on Bucket: Yes, Update Bucket Policy
- Click on Yes, Edit
The outcome for step 5 and 6 is the OAI for your Cloudfront distribution and a bucket policy for your bucket similar to this:
{
    "Version": "2008-10-17",
    "Id": "PolicyForCloudFrontPrivateContent",
    "Statement": [
        {
            "Sid": "1",
            "Effect": "Allow",
            "Principal": {
                "AWS": "arn:aws:iam::cloudfront:user/CloudFront Origin Access Identity XXXXXXXXXXXXXX"
            },
            "Action": "s3:GetObject",
            "Resource": "arn:aws:s3:::myexample-website/*"
        }
    ]
}
After you see your cloudfront distribution with Status of Deployed and State Enabled, you’ll be able to browse to your CloudFront Distribution by using the Domain Name URL, however you’ll probably need to append the index.html at the end of your domain name, for example:
https://xxsqfscsr3emm.cloudfront.net/index.html
Or your custom domain name if you configured it in that way.
So this is not an expected behavior since it provides a poor user experience and all other links in our blog become useless.
Append dinamycally the path using Lambda@Edge
Before this blog, I had a static website hosted on S3 which was only a single page showing my personal contact information and an animation using P5.js and I was able to show that single page using Cloudfront by only setting the default root object on the origin settings, however after uploading my blog to the S3 bucket, I noticed that by clicking on links like posts and the post itself, it failed due to the path showing: /post/hello/, however the static contet that needed to be served was actually /post/hello/index.html.
Searching on the net I’ve found one initial solution, however, looking at that blog post by Joseph Lust I noticed that it was using the features of redirection by hosting the website on S3 and only referrencing it through CloudFront, which works, but for me there’s a security issue since is a best practice to block all public access to your bucket, I know this is a public web, but well I have an OCD of following best practices.
So I kept searching to see if exists an option or setting on how to do this and I’ve found that the only way to achieve this is by using Lambda@Edge to programatically append the missing index.html to the request. This is a very good example on how you can use Lambda@Edge to alter a given request and force it follow a defined behavior. In contrast to vanilla Lambda, Lambda@Edge is deployed directly on the Edge locations closer to your clients and of course next to your Cloudfront distribution.
Ok, so let’s get started:
- Open AWS Console and go to Lambda
- Create a Lambda function:
- Author from scratch
- Function name: lambda-edge-helper
- Runtime: Node.js 12.x
- Click on Create function, now you’ll be on the Lambda console showing the Designer view and the Function code editor.
- Now we need to grant permissions to the Role to Assume the Lambda@Edge service. Click on Permissions and then click on the Role’s name, in my case: lambda-edge-helper-role-ntx0lufc
- This will open the IAM console
- Click on Trust relationships
- Click on Edit trust relationship
- You need to add a new entry in the ‘Service’ key’s array to add:
"edgelambda.amazonaws.com"
The policy document should look like this:
{
  "Version": "2012-10-17",
  "Statement": [
    {
      "Effect": "Allow",
      "Principal": {
        "Service": [
          "edgelambda.amazonaws.com",
          "lambda.amazonaws.com"
        ]
      },
      "Action": "sts:AssumeRole"
    }
  ]
}
- Click on Update trust Policy.
- Go back to the Lambda console on the Designer section and add a new trigger:
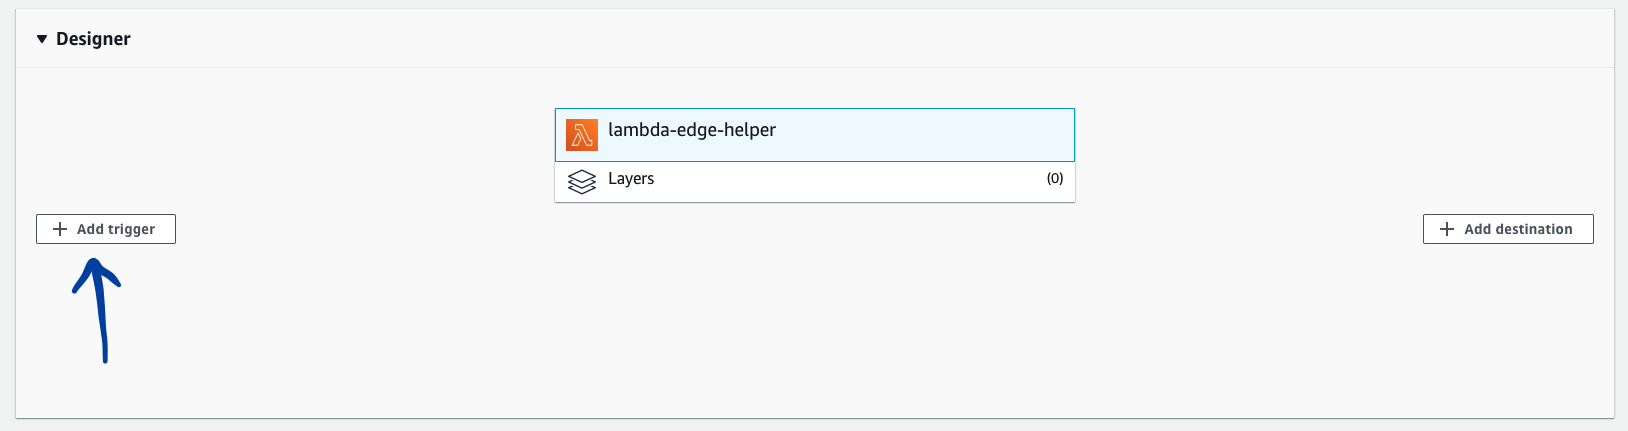
- Select a Trigger: Cloudfront
- Click on Deploy to Lambda@Edge, it will prompt you with a form screen with all the details filled, you just need to check the ‘I acknowledge that on deploy a new version of this function will be published with the above trigger and replicated across all available AWS regions.’
- Click on Deploy
This will update your CloudFront distribution to deploy your Lambda function.
- Update the code of the Lambda; scroll to Function code section and remove the existing code and replace it with the following code:
'use strict';
exports.handler = (event, context, callback) => {

    // Extract the request from the CloudFront event that is sent to Lambda@Edge
    var request = event.Records[0].cf.request;

    // Extract the URI from the request
    var olduri = request.uri;

    // Match any '/' that occurs at the end of a URI. Replace it with a default index
    var newuri = olduri.replace(/\/$/, '\/index.html');

    // Log the URI as received by CloudFront and the new URI to be used to fetch from origin
    console.log("Old URI: " + olduri);
    console.log("New URI: " + newuri);

    // Replace the received URI with the URI that includes the index page
    request.uri = newuri;

    // Return to CloudFront
    return callback(null, request);

};
- Click on Deploy, this will update the code of you Lambda and now you just need to wait for your CloudFront distribution to become Deployed and you’ll be ready to start deploying your content to your website.
I hope You liked this little turorial and that it helps you to become proficient with Hugo on AWS.
Let me know if you face any issues or errors by setting up your blog.